What Is Microsoft Signtool & How Can I Use It to Sign Executables?
Windows code signing made simple: learn in 5 easy steps how to eliminate unknown publisher warnings, build customer trust, and guarantee your code’s integrity by signing your executables using Microsoft Signtool!
Technology has never evolved so fast as it has in the last few years — and cybercrimes have evolved along with it. In 2020, SonicWall reported a 40% global increase in ransomware alone.
With millions of developers building and distributing executables, how can a user or customer know which ones they should trust? How can you, as a developer, prove that the Windows executables you publish were developed by you? Furthermore, how can they know that your software applications are safe to download and, ideally, malware-free because malicious third parties haven’t altered them?
All of this can be achieved by signing your code using Microsoft Signtool!
In this article, we’ll show you, step by step, how to sign your Windows executables using Microsoft Signtool.
How to Sign Executables Using Microsoft Signtool in 5 Steps
Code signing can be a daunting task sometimes, even for experienced developers who are already familiar with signing certificates. However, signing Windows executables with Signtool is a sleek process that can make a real difference for your customers and your business.
In this section, we’ll walk you through what you need and how you can sign your code and executables using Microsoft Signtool. (Note: You can no longer use kernel-mode driver packages using cross-signed code signing certificates. However, you can follow Microsoft’s new kernel-mode drive signing instructions, which can be found on the company’s Partner Center for Windows Hardware site.)
Prerequisites
To be able to sign your exe files with Microsoft Signtool, you must ensure that:
- You have purchased and installed a code signing certificate.
- If you don’t yet have a code signing certificate, check our previous article, including detailed information on how to get one. You can purchase code signing certificates from publicly trusted certificate authorities (CAs) like DigiCert and Sectigo.
- Microsoft Signtool is already installed on your machine..
- Signtool is included in your Windows software development kit (SDK). If it’s not installed on your machine, you must first download and install it.
- If you already have Visual Studio on your device, then Windows SDK is already part of it. To enable the SDK:
- Locate Visual Studio on your device and select Change.
- Click on Publishing Tools.
- Press the Universal Windows App Development Tools option.
- Select Windows 10 SDK.
Now that you’re all set, we can start the process of signing your exe files with Microsoft Signtool.
1. Open a Command Prompt With Admin Privileges Enabled
- Click the Start button.
- Type cmd in the run bar.
- Right-click on Command Prompt and select Run as administrator.
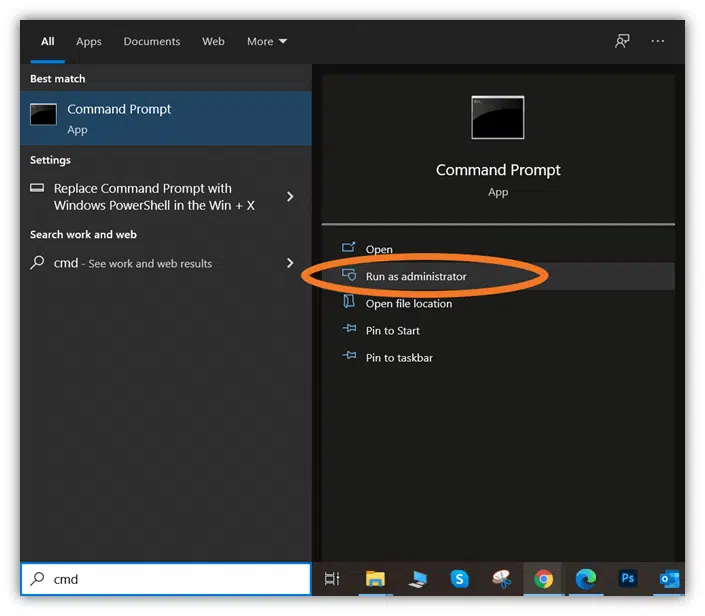
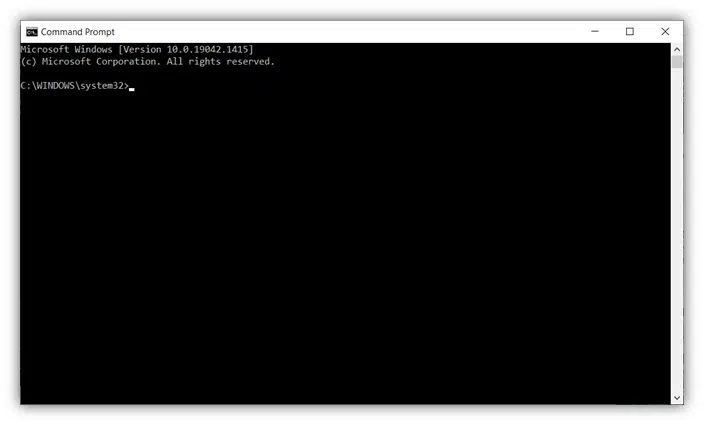
- Next, you’ll need to log in using your admin credentials. This will make a new Command Prompt window pop up that looks like this:
2. Go to the Directory Where Signtool.exe Is Located
In Command Prompt, you’ll need to redirect to the directory where you have Signtool installed on your device. To do this, you’ll type something like the following (depending on where Signtool is located on your local machine):
cd C:\Program Files (x86)\Windows Kits\10\bin\10.0.22000.0\x86
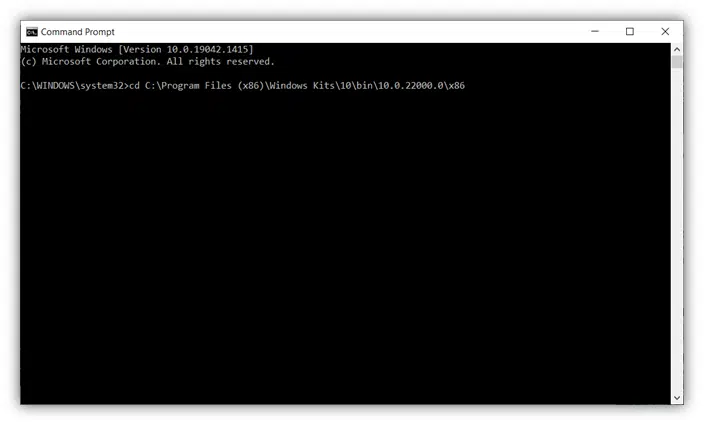
A screenshot that illustrates how to change directories to locate Microsoft Signtool.exe on your computer.
- Click enter to change the directory.
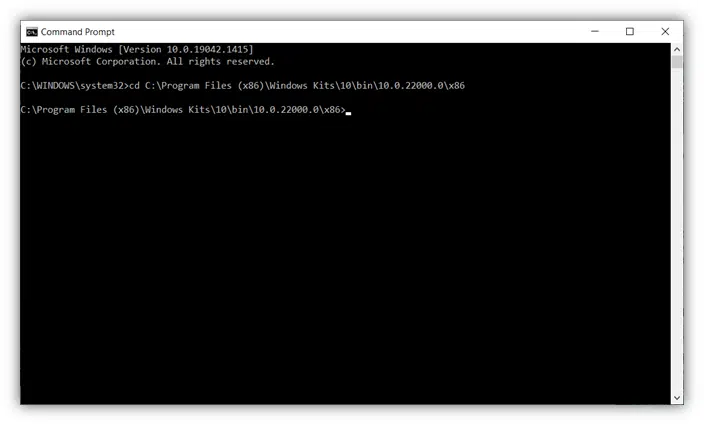
Tip: The example above is based on the standard installation directory. If you’ve installed your Signtool.exe in a different directory, make sure you follow the correct path.
3. Type the Command to Sign Your Executable
Once you’re in the right directory, you can sign your executable with Microsoft Signtool by typing a specific command that includes the timestamp server information of the certificate’s issuing certificate authority (CA). For example, you’ll use something along the lines of the following command if you’re signing code using a DigiCert code signing certificate:
signtool sign /f "c:\codesigningcertificate\digicert_certificate\codesigningcertificate.pfx" /p “yourpasswordhere” /tr https://timestamp.digicert.com /td SHA256 /fd SHA256 "c:\codesigningcertificate\example_software.exe"
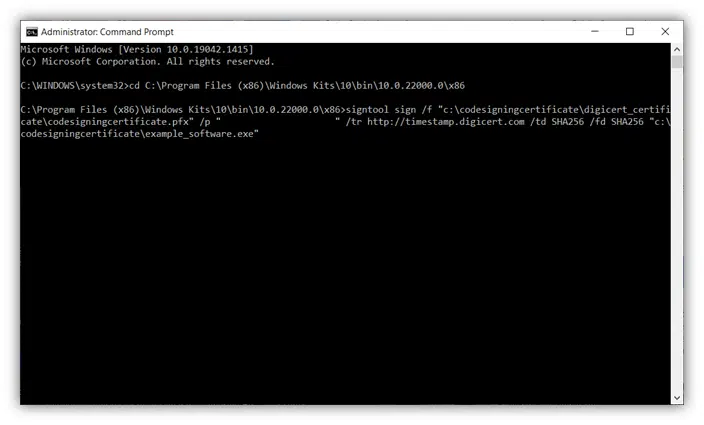
That’s it! Now, you should see a message indicating that your software was successfully signed.

Before we move to the next step (verifying that the signing truly worked), let’s have a look at the meanings of some of the command options used in the script:
- /f. This command allows you to specify the certificate file (and file path if it’s located in another location) you want to use to sign your software or other executable. Otherwise, you could use a few other options:
- /a. This command will automatically select the best code signing certificate among the ones installed in your certificate store. You can skip this step if you have only one code signing certificate.
- /n. If you have multiple certificates, you can also replace /a with the /n command followed by the exact name (within quotation marks) to specify the exact code signing certificate you want to use.
- /tr. This command designates the URL of the timestamp server. For example, when you use a DigiCert-issued code signing certificate, you’ll want to specify the timestamp.digicert.com time stamp authority (TSA) server. Read more about the importance of timestamping in our article “Best Practices of Code Signing Time Stamping: What Is It? Why It Matters””
- /td SHA256. It defines the secure hashing algorithm that is used by the RFC 3161 timestamp server to create the timestamp., In this example, we use the more secure hashing algorithm SHA256. While can technically use SHA1, it’s not recommended because that hashing algorithm has been deprecated.
- /fd SHA256. This command enables you to specify the specific algorithm you want to use to create the file’s signature.
- example_software.exe. In the example above, this phase indicates the name of the executable to sign. I’ve called mine example_software.exe Tip! If the executable is not in the same folder where Signtool is located, you’ll have to indicate the path (e.g., “c:\path\to\your\file.exe”).
4. Enter Your Token Password (Only Required for EV Code Signing Certificates)
- After typing the command described in step 3 and pressing the enter key, you’ll be prompted for your token password. This will only apply if you’re using an extended validation (EV) code signing certificate, which comes with a physical hardware security token.
- Type it now and select enter again.
If you did everything correctly, you’ll see a confirmation that your file has been signed like the one below.

Congratulation! You’ve now signed your executable!
5. Verify That Your Signature Has been Successful
Last but not least, let’s double-check that the exe file signature process with Signtool has been successful using the command:
signtool verify /pa /v “c:\filepath\example_software.exe”
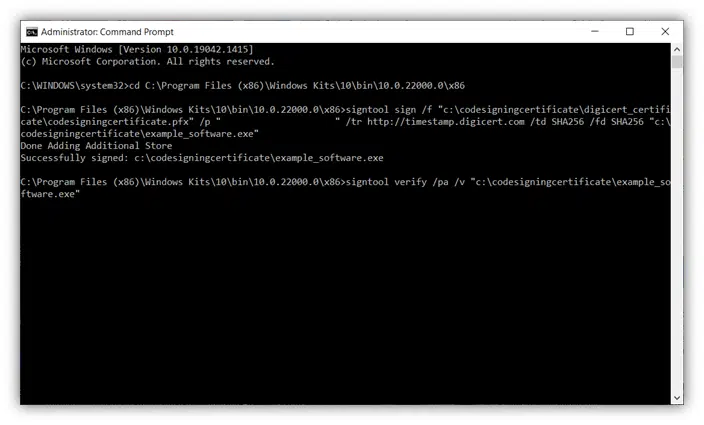
Again, a couple of information about the options used:
- /pa. This command indicates that we’ve signed an executable file.
- /v. This one stands for verbose. Basically, this means it will display detailed information about the outcome of the signing process (including warnings, timestamp info, and error messages [if any], see pictures below).

From now onward, when you check the properties of the signed .exe file selecting the Digital Signatures tab, you’ll be able to view a wealth of information, including:
- Your digital signature,
- The certificate used (and its corresponding trust chain), and
- Timestamping information that communicates the precise moment the software was digitally signed.
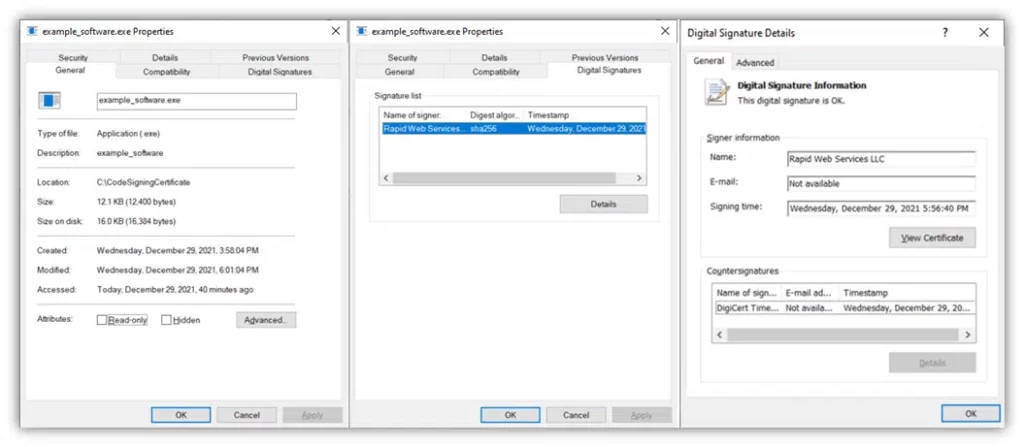
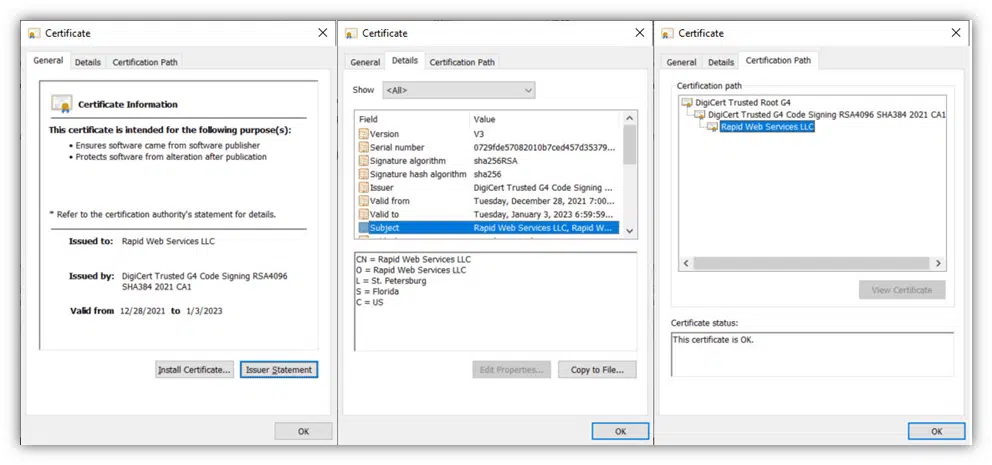
Easy and painless right?
Now that you know how to use Microsoft Signtool, let’s have a look to a few good reasons why you should sign your executables.
Why Signing Executables With Microsoft Signtool Matters
At the beginning of this article, we explained that code signing gives you a verifiable way to prove your identity as an authentic software developer/publisher. But there are many more benefits that you and your customers can enjoy when you choose to sign your .exe files, scripts, and other code with Microsoft Signtool.
- Shows that your software is legitimate and hasn’t been altered since you signed it. The digital signature proves that the file content is intact and unaltered. If the hash used to sign the executable matches the hash on the downloaded file, it means that the code has not been changed since it was originally signed. This will give peace of mind to your customers, ensuring them that the executable they’re downloading is authentic and trustworthy. If the hashes don’t match, the customer will get a security warning, or the download or installation process will fail.
- Gives you greater control of your products and brand name. Did you know that with code signing, no one can sign apps or executable files using your certificate except you or other authorized users (e.g., your developer colleagues) within your organization? This means that while someone can still create a dodgy app pretending to be you, they can’t sign the app, meaning that users who download and try to install the software will still receive warnings that it comes from an unknown publisher. This helps to protect your brand or company’s good name against cybercriminals who want to exploit it for illicit activities.
- Increases trust in you as a developer or publisher (with browsers, operating systems, and users alike). When your executables are signed, the warning messages are improved or mitigated entirely. For example, the “Unknown Publisher” Windows SmartScreen warning will be replaced by a pop-up displaying the publisher’s verified organizational details. Even better, if you use an EV code signing certificate when signing with Microsoft Signtool, it will help you to bypass the Windows SmartScreen warnings altogether.

Example of the unknown publisher warning message that displays when a user attempts to install an unsigned software application (or one that’s not signed by an EV code signing certificate).
- Boosts software distribution and revenue. More and more software publishers and platforms require codes to be signed with a signing certificate issued by an approved certificate authority prior publication and distribution. Being a multiplatform solution, code signing enables you to ensure that your verified and authenticated codes reach as many customers as possible on as many platforms as possible.
- Guarantees a safe customer experience and protects your reputation. Code signing helps you promote a better and more secure user experience and increases your reputation as a developer or publisher by:
- Minimizing security warnings,
- Reducing installation errors, and
- Assuring customers that your executables are trustworthy and safe to run.
- Helps promote lesser-known organizations or brands. A signing certificate issued by a trusted public CA is like a seal of trust. Signing codes with it helps smaller, lesser-known organizations or emerging brands to better position themselves on the market and attract new clients.
Final Thoughts on Signing Executables with Microsoft Signtool
As a software developer, you’re not only creating great applications; you’re also delivering value to your customers and business while protecting your brand name. It’s your responsibility to ensure that you provide secure and high-quality executables. Signing your scripts and other executables with Microsoft Signtool can help you achieve that goal.
Even if code signing is not mandatory everywhere, it’s strongly encouraged as an effective way to protect your users from attackers that try to use phony software to spread malware in your name. At the same time, you’ll protect your codes, brand, and reputation from the damage that infections or data breaches from such malware could cause.
If you never thought before to sign your Windows executables with Microsoft Signtool, now it’s time to give it a try.
Start today! Follow the five easy steps listed in this article, sign your code, and see your success as a software developer skyrocket!


