Tutorial: How to Check the Digital Signature of a File (in Linux and Windows)
Tutorial: How to Check the Digital Signature of a File (in Linux and Windows)
Did you just download a file or a program from your favorite website? How do you know that it’s safe? Explore how to check file signatures to verify if your file has been hijacked since it was signed
In its latest report, SpyCloud identified more than 22 million devices infected by malware in 2022 alone. How did cybercriminals manage to infect so many devices? SEO poisoning (i.e., search engine optimization poisoning) was one of the common malware distribution vectors used by attackers.
With this technique, attackers exploit Google Ads campaigns to promote the download of infected files and apps through phony websites. Knowing this, it shouldn’t come as a surprise to know that 43% of CISOs interviewed Red Access consider “browsing threats” their top concern for 2023.
So, how can you or your customers ensure that software programs and updates are safe, and haven’t been modified? By checking their digital signatures (i.e., blocks of cryptographic data that are used to validate the origins, authenticity, and integrity of files). In this tutorial, we’ll show you how to verify file signatures both in Linux and Windows, so that what you download is always the real deal. Ready to ramp up the security of your software downloads? Let’s get started.
How to Check if a File Is Signed in Windows and Linux
67% of organizations interviewed by Fortinet have been targeted by ransomware attacks at least once in 2023, and 65% of the victims were unable to completely recover their data.
Cybercriminals are getting sneaky and spreading malware in every possible way. They’re con artists who exploit users’ trust in well-known brands like Microsoft OneNote and Adobe Acrobat Sign. How? By sending out malicious attachments to users to trick them into downloading and opening infected files.
Verifying a file’s digital signature will help you protect your devices and/or organization from downloading and installing compromised code. How do you do it? Let’s break it down.
How to Check a Digital Signature of a File in Linux
If you’re using Linux and you think that you’re immune to malware infections, you may be in for a shock. Elastic Security Lab revealed in its latest report that, more than 54% of malware infections in 2022 targeted Linux endpoints!
Yup. Linux might have been considered a safe haven a few decades ago but, the tide is changing rapidly.
This is why, every time I download a file, I don’t just verify the file’s checksum (i.e., a random cryptographic value used to validate the integrity of a file); I also check its digital signature.
How?
Let’s say you want to install software that isn’t available in Linux repositories, like for example, VeraCrypt, an open-source, multiplatform disk encryption tool. After you’ve downloaded the Linux package from the official website, it’s time to start the steps to check the file’s digital signature (VeraCrypt uses PGP and X.509 digital signatures).
Note: The steps indicated below will work for most signed software. The process may slightly vary in some exceptional cases, for example, when the public key and/or the PGP signature file (more on that in a moment) are stored elsewhere or are included in a bundle.
1. Check If Gnu Privacy Guard (i.e., GnuPG or GPG) Is Already Installed on Your System
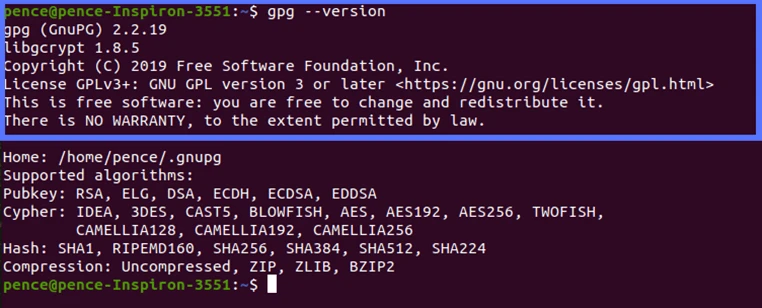
GnuPG is usually included in Ubuntu and other Linux operating systems; however, to play it safe, you may want to confirm it’s there. To do so:
- Press Ctrl+Alt+T to open a terminal window.
- Type “gpg –version” and then press enter.
If it displays the information about the version installed, you can move to the next step. If you get an error message (e.g., “command not found”), you’ll have to install it by typing the following commands in your terminal:
sudo apt-get update
sudo apt-get install gnupg
2. Download the Publisher’s Public Key
On the software download page, you’ll usually find a link to the publisher’s public key.

To download it
- Right-click on the link to copy it.
- In the terminal type: “wget” followed by the link you’ve just copied.
- Hit enter.

3. Import the GPG Key
Now you can import the public key to your local keyring (i.e., a virtual keychain used by the operating system to safely store your keys).
- In the terminal, navigate to the Download folder.
- Type “gpg –import filename” into the commandline.

Before moving on, don’t forget to compare the downloaded public key’s fingerprint to the one available on the publisher’s page. This will help you ensure:
- You’re using the correct one.
- The key you downloaded is original and hasn’t been compromised by a malicious third party.
To do so:
- In the terminal, navigate to the Download folder.
- Type the command “gpg –fingerprint.” The command will show you all the fingerprints included in your local keyring.

- Look for the one related to the software you want to install and compare it with the fingerprint published on the website you downloaded it from.


Good news: They match! Now, you can feel confident that the VeraCrypt software you’ve installed hasn’t been tampered with. Now, it’s time to ensure that the software application is legitimate (i.e., authentic).
4. Download the Pretty Good Privacy (PGP) Signature File
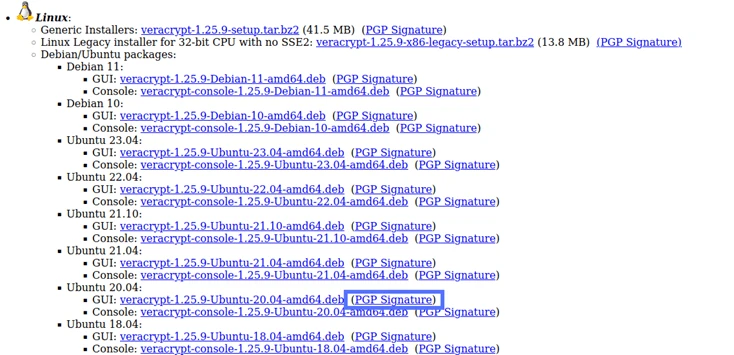
If you haven’t already downloaded the PGP signature file with the installer, now it’s time to do it. In this example, we’ll download the file related to Ubuntu 20 as it’s the operating system version I have on the machine used for this demo.
- Locate the PGP signature file link, click on it, and save it on your device.
5. Verify the Signature of the Installer
This is the moment of truth: Is the software you’ve just downloaded the original, authentic version? To certify this:
- Navigate to the folder where you saved the installer and the PGP signature file (e.g., Download folder).
- Use the command “gpg –verify” followed by the .sig file and the installer.

If you got an output like the one above, saying, “Good signature,” then the file hasn’t been modified since it was signed. You can install it with confidence.
Is the “Good signature” message followed by another message (“WARNING: This key is not certified with a trusted signature! There is no indication that the signature belongs to the owner”), like in the example above? No worries — the key has been verified as valid. According to Ubuntu.com, the message is just there to inform you that you haven’t signed VeraCrypt’s key to mark it as being an item on your trusted keys list (i.e., web of trust). VeraCrypt.eu states that you must sign the imported key; otherwise, you’ll always see an error message stating that the signing key is invalid (as shown in the example below) when you try to verify its PGP signature.

What if you get a “BAD signature” message when you run the script? This means that something is wrong, and you should proceed with caution. To give you an example, I have downloaded Ubuntu 21 VeraCrypt installer and matched it with the incorrect PGP signature for Ubuntu 20. The result? A bad signature result, as demonstrated in the screenshot below:

That’s it! Quick, painless, and easy. Hold on, what if you have Windows? Can you check the digital signature of a file there too? Of course, you can! And it’s even easier. Read on.
How to Check a Digital Signature of a File in Windows 10
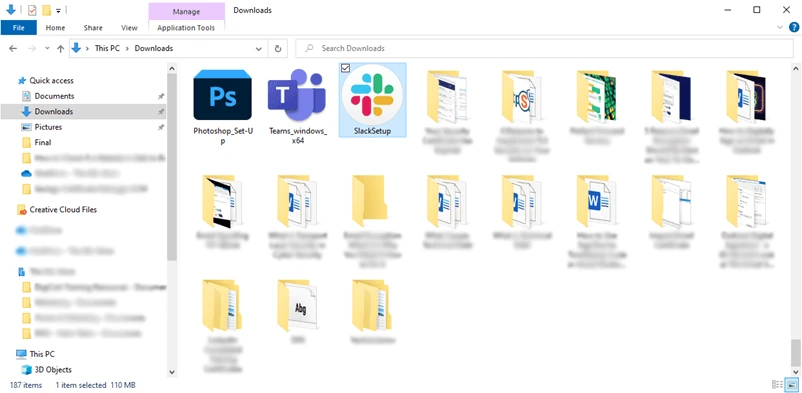
There are several ways to verify the signature of a code in a Windows operating system. We’ll use File Explorer, the most common method available to everyone, and that doesn’t require any additional software. This time, we’ll use the communication application Slack as an example to check its X.509 digital signature.
1. Navigate to the Folder Where You Saved the Installer
Once you’ve downloaded the installer file:
- Click on the file icon on your taskbar.

- Navigate to the location where the installer is saved.
2. View the File’s Digital Signature
Did you find the file? Good. Now:
- Right-click on it and select Properties. This will open a new pop-up window.
- In the new window, click on the Digital Signatures tab. If the file has been digitally signed, you’ll see the signer’s name, the algorithm used, and the timestamp (if any).
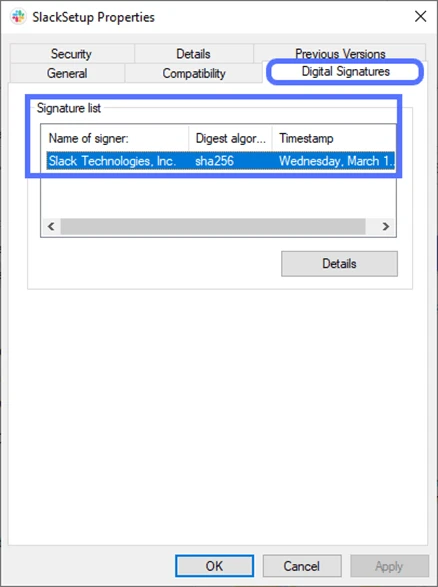
3. Verify the Digital Signature
To check if the signature is valid:
- Click on the Details button.
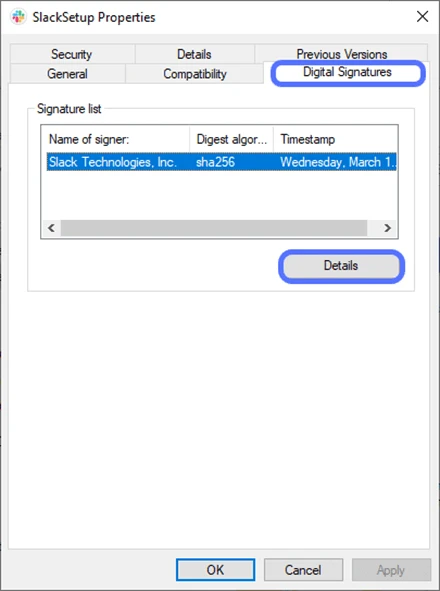
A pop-up window will come up. Does it say, “This digital signature is OK?” Yippee! The signature is genuine.
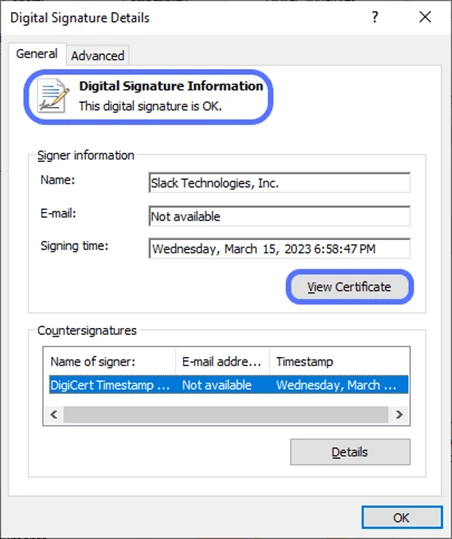
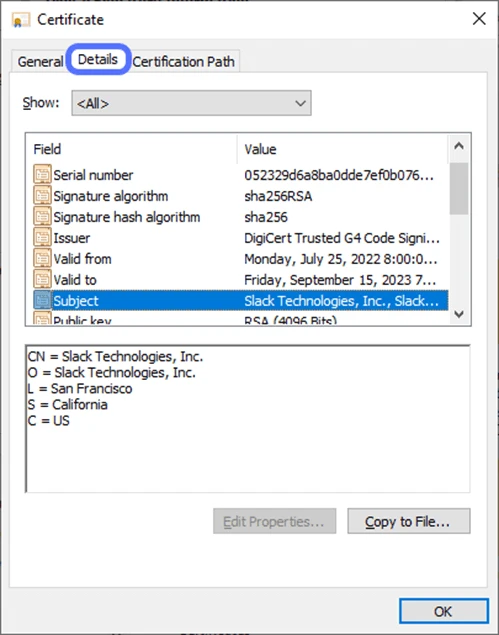
Want to know more details about the signature? Go through the signer information listed, and click on the View Certificate button to check the public key infrastructure (PKI) certificate used:
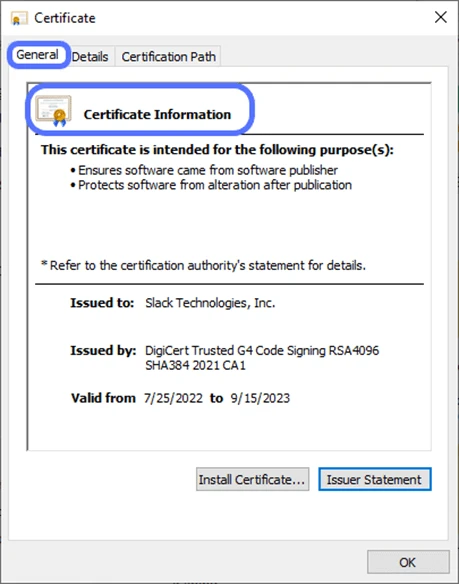
Navigate to the Details tab to learn more specifics about the certificate’s cryptographic security components and certificate Subject.
So, now that you know how to check file signatures, make sure you do it every time you download new software, because as an ancient English proverb said, “If you trust before you try, you may repent before you die.”
Are you a developer or a software house and you still don’t sign your codes? Discover six good reasons why you should release signed code and software. Additionally, here’s some information about what happens when you use or release unsigned code or software.
Final Thoughts on How to Check the Digital Signature of a File in Linux and Windows
Ransomware, spyware, and keyloggers are just a few examples of malware that could be included in a compromised file or executable. This is why in today’s digital environment, it’s no longer enough to
- Trust the developer without validating their digital identity,
- Blindly assume that the vendor’s website is safe, or even
- Rely solely on the file checksum.
Are you a Linux user? GPG will help you confirm the validity of a digital signature in five simple steps. Windows users will get it done and dusted even faster, through File Explorer.
Yup. No matter which operating system you use, what you’ve learned today will help you minimize the risks of downloading malware and keep your organization, and data secure. Goodbye unwanted, dangerous programs; welcome, secure downloads.


